Download Jpaw
The Java Photo Album Wizard
What is Jpaw:
-
Jpaw takes directories of images (jpegs) and creates
an HTML photo album and scaled down thumbnails that
link to the orginal images.
Jpaw Features:
- Platform independent Java:
-
Jpaw is written in java. So if you can run
the Java Virtual Machine, you can run Jpaw.
Jpaw uses the Sun image toolkit. So you will need to run Sun's JVM version 1.2 or higher.
http://java.sun.com/j2se/downloads.html - Easy to use interface:
-
Jpaw has a simple GUI that will help you
to generate you photo albums easily.
- Remembers where you left off:
-
When you make a photo album, Jpaw will write
a jpaw.dat file which contains all of your
prefernces for that album. If you want to go
back and make changes, all of your prefences
will be remembered. So you can start from
where you left off.
- Annotations:
-
Jpaw has a section that will let your preview
thumbnails of your images and add notes to
each one. These notes will be displayed as
role over text on your photo album web page.
- Custimization:
-
Jpaw uses HTML tags to build your photo
album. You can edit all of these tags and
customize how your photo album will look.
You can also set the maxmimum size of your thumbnails, and how many columns wide it should be.
-
There are a lot of photo album options, most are
dynamic and allow for many advanced features.
Some people may not want the extra complexity or
don't need the features. You may not have access
to a web server from which you can run custom code
or access a database.
Jpaw generates the album and thumbnails once. You can serve them like any other web page. You don't need script access, or a database. It is lightwight and easy.
-
You will need the Java Virtual Machine installed
for Jpaw to work. Make sure that "java" is
executable from your command prompt.
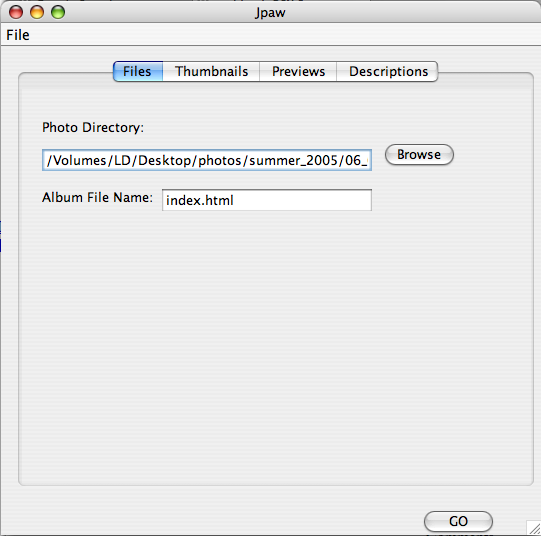
Files Tab
On this screen you select your directory full of image files and the name of the album file you would like to generate.- Photo Directory: The location of your photos. This should be a directory.
- Album File Name: The name of the HTML photo album you will create. By default, this is "index.html."
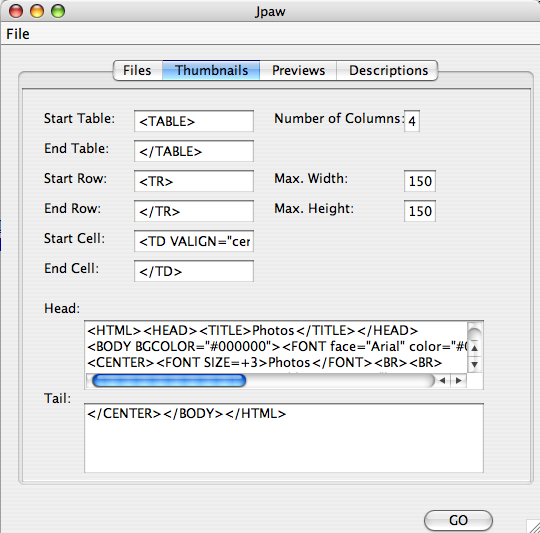
Thumbnails Tab
On this screen you can customize these HTML tags and album properties- Start Table: The tag used to start the photo table.
- End Table: The tag used to end the photo table.
- Start Row: The tag used to start a row of photos.
- End Row: The tag used to end a row of photos.
- Start Cell: The tag used to start a photo cell.
- End Cell: The tage used to end a photo cell.
- Number of Columns: The number of columns in table of photos.
- Max. Height: When the image is scaled down to fit, if height is the limiting factor, it should be no taller than this many pixels.
- Max. Width: When the image is scaled down to fit, if width is the limiting factor, it should be no wider than this many pixels.
- Head: HTML to start the page with.
- Tail: HTML to end the page with.
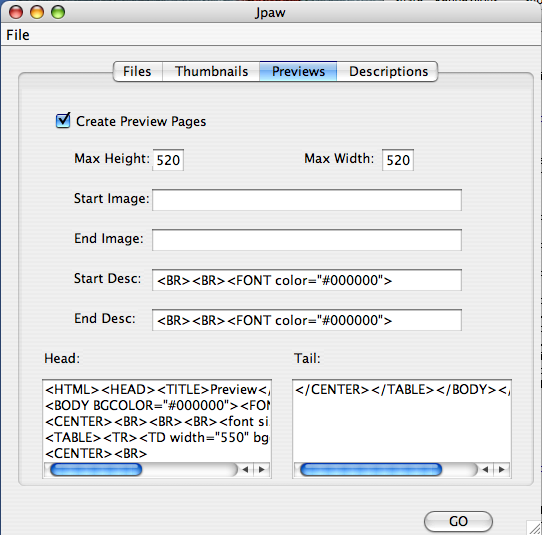
Previews Tab
On this screen you can customize how the preview pages will look, or even if you make any. Sometimes the pictures you are making an album from are too big to be displayed easily. So the preview is a medium size thumbnail. If you have previews enabled, people will see a medium sized image when they click on the thumbnails instead of the full size image. From the preview, they can get the full size image.- Create Preview Pages: If this is not checked, you will create no preview pages.
- Max Height: This is the maximum height in pixels of the preview images.
- Max Width: This is the maximum width in pixels of the preview images.
- Start Image: HTML that is placed before starting the IMG tag.
- End Image: HTML that is placed after ending the IMG tag.
- Start Desc: HTML that is placed before any description.
- End Desc: HTML that is placed after any description.
- Head: HTML that starts off all preview pages.
- Tail: HTML to end the page with.
http://java.sun.com/j2se/downloads.html
java -jar jpaw_1.2.jar [photo dir: optional]
Once you start Jpaw, this is what you will see:
If you want to customize your photo album, then you will want to use the additional screens.
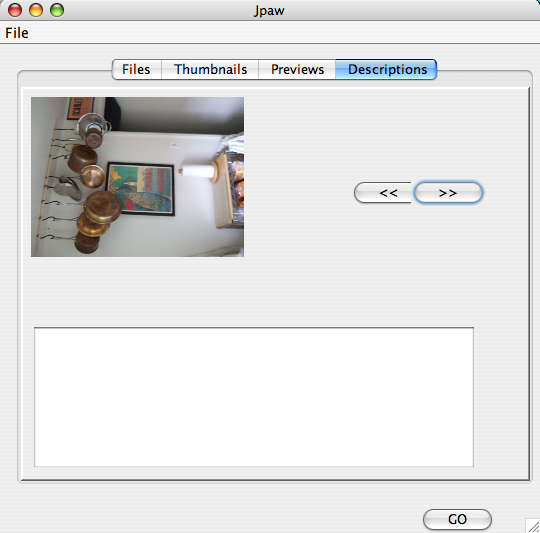
Finally, the Annotations screen will let you preveiw all the photos in the directory that you have selected and add notes to each photo. These notes will be displayed in a web browser as roll-over text. If you have previews enabled, this will also be used as the photo's description.